목차
단계
#Steps:
#1. Convert the Image to Gray Scale
#2. Find the edges in the image using Canny Edge Detector
#3. Find and Draw the Contours
#4. Find the Corner Points
#5. Apply Warp Perspective
0. 이미지 불러오기
#Import All the Required Libraries
import cv2
import numpy as np

#Read the image using OpenCV
image = cv2.imread("../Resources/Images/documentscanner.jpg")

#Display the Image
cv2.imshow("Image", image)
cv2.waitKey(0)
cv2.destroyAllWindows()
사이즈 줄이기
이유 : 크기 표준화 / 해상도 줄이기 / 출력화면에 맞추기
#resize(원본, (가로, 세로))
image = cv2.resize(image, (768, 800))
#shape (세로, 가로, 채널)
print("Image shape", image.shape, image.size)
이미지 카피해놓기
cv2.imshow("Image Contour", imageDrawContour)
1. 이미지를 그레이스케일로 바꾸기
그레이스케일 = 흑백
컬러 정보를 없애면 연산이 단순해지고, 엣지 감지가 효과적임
imageGray = cv2.cvtColor(image, cv2.COLOR_BGR2GRAY)
2. 엣지 검출기로 경계 찾기
엣지 = 경계선
이미지에서 경계 부분만 강조하여 검출하기
낮은 임계값과 높은 임계값을 설정하여 강한 엣지만 남긴다.
하한 임계값 = threshold1 : 이 값보다 작은 픽셀들은 엣지로 간주하지 않음 : 노이즈 줄임
상한 임계값 = threshold2 : 이 값보다 큰 픽셀들은 엣지로 확정 : 중요한 엣지 검출
일반적으로는 하한100, 상한 200으로 잡음
각 이미지 특징에 대해 경계값을 설정하는 방법은 아주 다양하기 때문에 그때마다 적이하게 사용할 것.
imageCanny = cv2.Canny(imageGray, 200, 200)
def preprocessing(image):
    # 1. Convert the Image to Gray Scale
    imageGray = cv2.cvtColor(image, cv2.COLOR_BGR2GRAY)
    # 2. Find the edges in the image using Canny Edge Detector
    imageCanny = cv2.Canny(imageGray, 200, 200)
    return imageCanny

imageCanny = preprocessing(image)
cv2.imshow("Image Canny", imageCanny)
3. 컨투어 찾고 그리기
컨투어 = 연속된 경계선
검출된 엣지를 기반으로 컨투어를 찾고 객체를 감싸는 선을 그린다.
cv2/findContours(image, mode, method)
image: 반드시 흑백
mode: 윤곽선 찾는 방법 - external 바깥쪽..등등!
method: 윤곽선을 근사화하는 방법: chain_approx_none 윤곽선의 모든 점을 저장(많은 점), simple 직선 부분은 끝 점만 저장(메모리 절약)
def findDrawContours(imageCanny):
    #3. Find and Draw the Contours
    #가장 바깥쪽 윤곽선만 검출 : cv2.RETR_EXTERNAL
    #꼭 필요한 점들만 남겨 컨투어 단순화 : cv2.CHAIN_APPROX_NONE
    #Contour : 윤곽선 리스트
    contours, hirearchy = cv2.findContours(imageCanny, cv2.RETR_EXTERNAL, cv2.CHAIN_APPROX_NONE)
    for cnt in contours: # -1: 모든 윤곽선을 그림
        cv2.drawContours(imageCopy, cnt, -1, (255, 0,0), 2)
    return imageCopy

 imageDrawContour = findDrawContours(imageCanny)

cv2.imshow("Image Contour", imageDrawContour)
위에 사진을 보면 contour가 내가 관심있는 문서 뿐만이 아니라 바깥 배경화면에도 이리저리 파란 점이 찍혀있다. 따라서 문서만 제외하고 나머지는 포함되지 않도록 area면적을 이용해 코드를 수정한다.
    contours, hirearchy = cv2.findContours(imageCanny, cv2.RETR_EXTERNAL, cv2.CHAIN_APPROX_NONE)
    for cnt in contours: # -1: 모든 윤곽선을 그림
        area = cv2.contourArea(cnt)
        print(area)
contour리스트 중 유독 큰 면적인 것이 보인다. 그것이 바로 문서의 영역이다.

def findDrawContours(imageCanny):
    #3. Find and Draw the Contours
    #가장 바깥쪽 윤곽선만 검출 : cv2.RETR_EXTERNAL
    #꼭 필요한 점들만 남겨 컨투어 단순화 : cv2.CHAIN_APPROX_NONE
    #Contour : 윤곽선 리스트
    contours, hirearchy = cv2.findContours(imageCanny, cv2.RETR_EXTERNAL, cv2.CHAIN_APPROX_NONE)
    for cnt in contours: # -1: 모든 윤곽선을 그림
        area = cv2.contourArea(cnt)
        # print(area)
        if area > 30000:
            cv2.drawContours(imageCopy, cnt, -1, (255, 0,0), 2)
    return imageCopy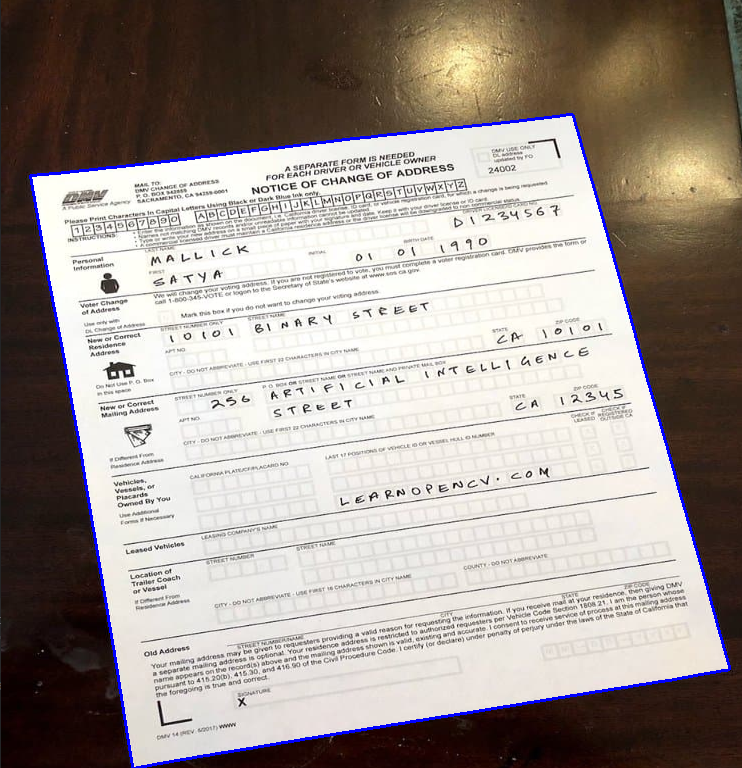
4. 코너 포인트 찾기
코너 = 꼭짓점
검출된 컨투어에서 꼭짓점을 찾는다.
1) cv2.arcLength() 객체의 둘레 perimeter 구하기
peri = cv2.arcLength(cnt, True)2) epsilon 값을 설정 : 원본 윤곽선과 근사 윤곽선 사이의 최대 오차 허용량
3) cv2.approxPolyDP() 윤곽선을 단순화하여 최소한의 꼭짓점 남김
approx = cv2.approxPolyDP(cnt, 0.02*peri, True)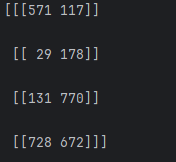
4) 그리기
cv2.drawContours(imageCopy, approx, -1, (255, 255,0), 10)
< 전체 코드>
def findDrawContours(imageCanny):
    #3. Find and Draw the Contours
    #가장 바깥쪽 윤곽선만 검출 : cv2.RETR_EXTERNAL
    #꼭 필요한 점들만 남겨 컨투어 단순화 : cv2.CHAIN_APPROX_NONE
    #Contour : 윤곽선 리스트
    contours, hirearchy = cv2.findContours(imageCanny, cv2.RETR_EXTERNAL, cv2.CHAIN_APPROX_NONE)
    for cnt in contours: # -1: 모든 윤곽선을 그림
        area = cv2.contourArea(cnt)
        # print(area)
        if area > 30000:
            cv2.drawContours(imageCopy, cnt, -1, (255, 0,0), 2)
            # 4. Find the Corner Points
            #윤곽선 길이 계산 - 객체의 둘레 :perimeter 구하기
            peri = cv2.arcLength(cnt, True)
            approx = cv2.approxPolyDP(cnt, 0.02*peri, True)
            print(len(approx))
            cv2.drawContours(imageCopy, approx, -1, (255, 255,0), 10)
    return imageCopy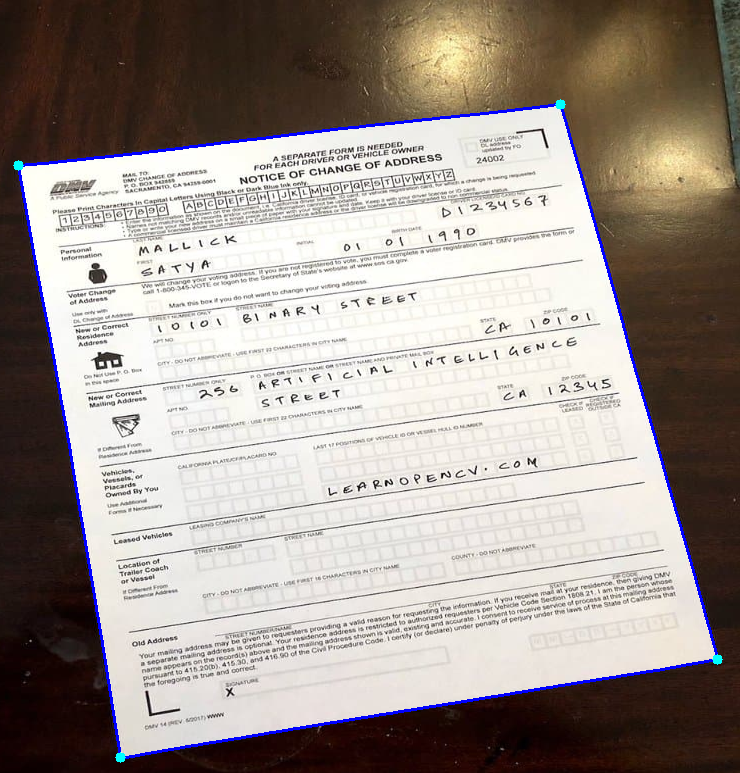
최종 코너포인트 찾기
def findDrawContours(imageCanny):
    maxarea=0
    #특정한 윤곽선(예: 가장 큰 사각형)을 찾을 때 초기값을 설정하는 용도
    biggest = np.array([])
    #3. Find and Draw the Contours
    #가장 바깥쪽 윤곽선만 검출 : cv2.RETR_EXTERNAL
    #꼭 필요한 점들만 남겨 컨투어 단순화 : cv2.CHAIN_APPROX_NONE
    #Contour : 윤곽선 리스트
    contours, hirearchy = cv2.findContours(imageCanny, cv2.RETR_EXTERNAL, cv2.CHAIN_APPROX_NONE)
    for cnt in contours: # -1: 모든 윤곽선을 그림
        area = cv2.contourArea(cnt)
        # print(area)
        if area > 30000:
            cv2.drawContours(imageCopy, cnt, -1, (255, 0,0), 2)
            # 4. Find the Corner Points
            #윤곽선 길이 계산 - 객체의 둘레 :perimeter 구하기
            peri = cv2.arcLength(cnt, True)
            approx = cv2.approxPolyDP(cnt, 0.02*peri, True)
            print(len(approx))
            # print(approx)
            if area >maxarea and len(approx)==4:
                biggest = approx
                maxarea = area
            cv2.drawContours(imageCopy, approx, -1, (255, 255,0), 10)
    return biggest, imageCopy


#Display the Image
imageCanny = preprocessing(image)
biggest, imageDrawContour = findDrawContours(imageCanny)
print("Corner Points", biggest)
5. 원근 변환 적용
Warp Perspective = 원극 변환
검출된 꼭짓점으로 이미지를 사각형 형태로 변환한다.
문서를 스캔할 때 왜곡된 종이를 평평하게 만들 때 사용함
1) 가로, 세로 길이 정하기
#resize(원본, (가로, 세로))
image = cv2.resize(image, (768, 800))
#shape (세로, 가로, 채널)
print("Image shape", image.shape, image.size)
imageCopy = image.copy()
width = 768
height = 800
2) 원본이미지를 원근변환
def getWarp(image, biggest):
    # 원본 이미지에서 변환할 4개의 좌표
    pts1 = np.float32(biggest)
    #변환 후 새로운 4개 꼭짓점 (새로운 크기로 조정)
    pts2 = np.float32([[0,0], [width, 0], [0, height], [width, height]])
    #원근 변환을 위한 변환 행렬 생성
    matrix = cv2.getPerspectiveTransform(pts1, pts2)
    #변환 행렬을 적용하여 새로운 이미지 생성
    imageOutput = cv2.warpPerspective(image, matrix, (width, height))
    return imageOutput
#Display the Image
imageCanny = preprocessing(image)
biggest, imageDrawContour = findDrawContours(imageCanny)
print(biggest.size)
if biggest.size != 0:
imageOutput = getWarp(image, biggest)
print("Corner Points", biggest)
cv2.imshow("Image", imageOutput)
cv2.waitKey(0)
else:
cv2.imshow("Image", image)
cv2.waitKey(0)
실패함
biggest의 shape이 다르기 때문이다.
(original)
biggest.shape
biggest
(4, 1, 2)
[[[571 117]]
[[ 29 178]]
[[131 770]]
[[728 672]]]
(변환)
def reorder(biggest):
    print(biggest.shape)
    print(biggest)
    biggest = biggest.reshape((4,2))
    print(biggest.shape)
    print(biggest)
(4, 2)
[[571 117]
[ 29 178]
[131 770]
[728 672]]
biggestNew[0]: 왼쪽 상단 코너
biggestNew[1]: 오른쪽 상단 코너
biggestNew[2]: 왼쪽 하단 코너
biggestNew[3]: 오른쪽 하단 코너
# biggest 배열에 저장된 4개의 코너 좌표들을 시계방향 순서대로 정렬
def reorder(biggest):
    biggest = biggest.reshape((4,2))
    biggestNew = np.zeros((4,1,2), np.int32)
    add = biggest.sum(1)
    print(add)
    biggestNew[0] = biggest[np.argmin(add)]
    biggestNew[3] = biggest[np.argmax(add)]
    diff = np.diff(biggest, axis=1)
    biggestNew[1] = biggest[np.argmin(diff)]
    biggestNew[2] = biggest[np.argmax(diff)]
    return biggestNew

#Display the Image
imageCanny = preprocessing(image)
biggest, imageDrawContour = findDrawContours(imageCanny)
# print(biggest.size)
if biggest.size != 0:
    biggestNew = reorder(biggest)
    imageOutput = getWarp(image, biggestNew)
    # print("Corner Points", biggest)
    cv2.imshow("Image Oputput", imageOutput)
    cv2.waitKey(0)
else:
    cv2.imshow("Image", image)
    cv2.waitKey(0)
이미지 크롭
배경이 살짝 나오기 때문에 각각의 방향마다 20씩 사진을 줄인다.
imageCropped = imageOutput[20:imageOutput.shape[0] -20, 20:imageOutput.shape[1]-20]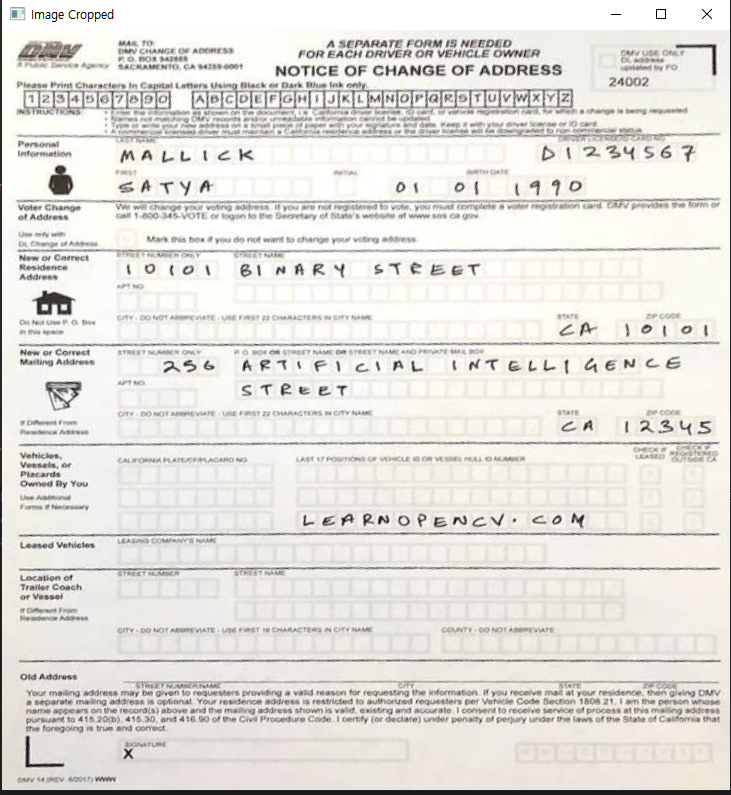
<전체 코드
#Steps:
#1. Convert the Image to Gray Scale
#2. Find the edges in the image using Canny Edge Detector
#3. Find and Draw the Contours
#4. Find the Corner Points
#5. Apply Warp Perspective

#Import All the Required Libraries
import cv2
import numpy as np

#Read the image using OpenCV
image = cv2.imread("../Resources/Images/documentscanner.jpg")
print("Image shape", image.shape, image.size)


#resize(원본, (가로, 세로))
image = cv2.resize(image, (768, 800))
#shape (세로, 가로, 채널)
print("Image shape", image.shape, image.size)
imageCopy = image.copy()
width = 768
height = 800


def preprocessing(image):
    # 1. Convert the Image to Gray Scale
    imageGray = cv2.cvtColor(image, cv2.COLOR_BGR2GRAY)
    # 2. Find the edges in the image using Canny Edge Detector
    imageCanny = cv2.Canny(imageGray, 200, 200)
    return imageCanny

def findDrawContours(imageCanny):
    maxarea=0
    #특정한 윤곽선(예: 가장 큰 사각형)을 찾을 때 초기값을 설정하는 용도
    biggest = np.array([])
    #3. Find and Draw the Contours
    #가장 바깥쪽 윤곽선만 검출 : cv2.RETR_EXTERNAL
    #꼭 필요한 점들만 남겨 컨투어 단순화 : cv2.CHAIN_APPROX_NONE
    #Contour : 윤곽선 리스트
    contours, hirearchy = cv2.findContours(imageCanny, cv2.RETR_EXTERNAL, cv2.CHAIN_APPROX_NONE)
    for cnt in contours: # -1: 모든 윤곽선을 그림
        area = cv2.contourArea(cnt)
        # print(area)
        if area > 30000:
            cv2.drawContours(imageCopy, cnt, -1, (255, 0,0), 2)
            # 4. Find the Corner Points
            #윤곽선 길이 계산 - 객체의 둘레 :perimeter 구하기
            peri = cv2.arcLength(cnt, True)
            approx = cv2.approxPolyDP(cnt, 0.02*peri, True)
            print(len(approx))
            # print(approx)
            if area >maxarea and len(approx)==4:
                biggest = approx
                maxarea = area
            cv2.drawContours(imageCopy, approx, -1, (255, 255,0), 10)
    return biggest, imageCopy

def getWarp(image, biggest):
    # 원본 이미지에서 변환할 4개의 좌표
    pts1 = np.float32(biggest)
    #변환 후 새로운 4개 꼭짓점 (새로운 크기로 조정)
    pts2 = np.float32([[0,0], [width, 0], [0, height], [width, height]])
    #원근 변환을 위한 변환 행렬 생성
    matrix = cv2.getPerspectiveTransform(pts1, pts2)
    #변환 행렬을 적용하여 새로운 이미지 생성
    imageOutput = cv2.warpPerspective(image, matrix, (width, height))
    imageCropped = imageOutput[20:imageOutput.shape[0] -20, 20:imageOutput.shape[1]-20]
    return imageCropped

# biggest 배열에 저장된 4개의 코너 좌표들을 시계방향 순서대로 정렬
def reorder(biggest):
    biggest = biggest.reshape((4,2))
    biggestNew = np.zeros((4,1,2), np.int32)
    add = biggest.sum(1)
    print(add)
    biggestNew[0] = biggest[np.argmin(add)]
    biggestNew[3] = biggest[np.argmax(add)]
    diff = np.diff(biggest, axis=1)
    biggestNew[1] = biggest[np.argmin(diff)]
    biggestNew[2] = biggest[np.argmax(diff)]
    return biggestNew

#Display the Image
imageCanny = preprocessing(image)
biggest, imageDrawContour = findDrawContours(imageCanny)
# print(biggest.size)
if biggest.size != 0:
    biggestNew = reorder(biggest)
    imageOutput = getWarp(image, biggestNew)
    # print("Corner Points", biggest)
    # cv2.imshow("Image Oputput", imageOutput)
    cv2.imshow("Image Cropped", imageOutput)
    cv2.waitKey(0)
else:
    cv2.imshow("Image", image)
    cv2.waitKey(0)


cv2.destroyAllWindows()
openCV 기초 공부
'머신러닝 > openCV' 카테고리의 다른 글
| openCV 중급 손가락으로 그리기 (0) | 2025.03.05 |
|---|---|
| openCV 기초, mediapipe 설치 에러 해결하기, dll문제 (0) | 2025.03.04 |
| openCV 기초 shape detection, contour, approx, 다각형 찾기, bounding 그리기 (0) | 2025.02.22 |
| openCV 기초, join, 사진 합치기 쌓기, 색깔 감지하기, bitwise_and, mask (0) | 2025.02.20 |
| OpenCV 기초, Wrap perspective, flatten, 사진 펼치기, 스캔 (0) | 2025.02.19 |