목차
오늘은 허깅페이스 토큰 이용하여 코랩에서 로그인하여 원하는 모델 가져오고 저장하는 것, 해당 모델 미세튜닝하여 자연어처리하는 방법에 대해 안내한다.
1. 문장 토큰화 : transformers 에서 AutoTokenizer 가져오기
from transformers import AutoTokenizer
model_ckpt = "distilbert-base-uncased"
tokenizer = AutoTokenizer.from_pretrained(model_ckpt)
1) Auto Tokenizer
- 사전 훈련된 모델에 연관된 토크나이저를 빠르게 로드하는 클래스
- 다양한 모델에 대해 자동으로 올바른 토크나이저 선택해주는 유연한 클래스.
- 특정 모델을 지정하면, 해당 모델에 맞는 적합한 토크나이저를 로드함
2) model_ckpt = model checkpoint
- 모델 학습 중간에 저장된 상태, 모델의 가중치(weights), 학습상태, optimizer parameter 등 저장
- checkpoint 이름 사용해 모델, 가중치, 어휘사전 자동 추출
3) from_pretrained()
허브의 모델ID나 로컬 파일 경로호출하기
2. 데이터셋 호출하기
pip install datasets
# 데이터셋 설치
from datasets import load_dataset
emotions = load_dataset("emotion")
emotions
<문장에 따라 감정 라벨이 붙어 있는 emotions 데이터임>

3. 전체 데이터 토큰화
1) 함수
def tokenize(batch):
      return tokenizer(batch["text"], padding=True, truncation=True)
- ★ padding : 배치에 있는 가장 긴 샘플 크기에 맞춰 샘플을 0으로 패딩 -> 길이 동일하게 맞춤
- ★ truncation : 모델의 최대 문맥 크기에 맞춰 샘플 자르기
2) mapping하기
emotions_encoded = emotions.map(tokenize, batched=True, batch_size= None)- ★ batch_size = None 배치 사이즈가 전체(1개)
- emotion dataset에 input ids와 attention mask열을 새롭게 추가됨
---> 데이터 준비 완료!
4. 사용할 모델 로드
import torch
from transformers import AutoModelForSequenceClassification
num_labels=6
model_ckpt = "distilbert-base-uncased"
device= torch.device("cuda" if torch.cuda.is_available() else "cpu")
model = (AutoModelForSequenceClassification.from_pretrained(model_ckpt, num_labels=num_labels).to(device))
- pretrained된 DistilBERT 모델인 AutoModelForSequenceClassification
- 사전 훈련된 모델 출력 위에 베이스모델과 함께 쉽게 훈련할 수 있는 분류 헤드가 있음
- 헤드 출력 크기 정하기 위해 레이블 개수 지정하기
5. 성능평가지표
from sklearn.metrics import accuracy_score, f1_score
def compute_metrics(pred):
  labels = pred.label_ids
  preds = pred.predictions.argmax(-1)
  f1 = f1_score(labels, preds, average="weighted")
  acc = accuracy_score(labels, preds)
  return {"accuracy": acc, "f1": f1}
- 모델 훈련하며 지표가 되는 성능평가표 만들기
- 정확도와 f1 score 사용하기
6. 허깅페이스 로그인
from huggingface_hub import notebook_login
notebook_login()
- 토큰 입력창이 나옴
허깅페이스 > setting > Acess Tokens > 생성하기> 토큰 복사하기
- 토큰 붙여넣기
7. 모델 미세튜닝하기
1) Trainer 클래스
허깅페이스 transformers 라이브러리에서 제공하는 매우 중요한 클래스
모델을 효율적으로 학습하고 평가, 저장, 재활용하는 기능 제공
* 모델 훈련
* 평가
* 저장
from transformers import Trainer, TrainingArguments

# 모델과 데이터셋 준비 (예시)
model = ...  # 예: BERT 모델 불러오기
train_dataset = ...  # 학습용 데이터셋

# 훈련 설정
training_args = TrainingArguments(
    output_dir='./my_model',  # 모델이 저장될 디렉토리
    num_train_epochs=3,       # 학습할 에폭 수
    per_device_train_batch_size=16,  # 각 디바이스에서의 배치 크기
)

# Trainer 설정
trainer = Trainer(
    model=model,                 # 훈련할 모델
    args=training_args,           # 훈련 설정
    train_dataset=train_dataset,  # 학습 데이터셋
)

# 훈련 시작
trainer.train()

# 모델이 './my_model' 디렉토리에 저장됨


from transformers import AutoModelForSequenceClassification

# 저장된 모델 불러오기
model = AutoModelForSequenceClassification.from_pretrained('./my_model')

# 모델이 불러와졌으니 다시 학습시키지 않고 바로 사용 가능

from transformers import AutoTokenizer

# 토크나이저 불러오기 (모델과 동일한 사전 사용)
tokenizer = AutoTokenizer.from_pretrained('./my_model')

# 입력 텍스트
text = "이 영화 정말 재미있어요!"

# 텍스트를 토큰으로 변환
inputs = tokenizer(text, return_tensors="pt")

# 모델을 사용해서 예측
outputs = model(**inputs)

# 출력 결과 확인
print(outputs)
2) TrainingArguments 클래스
from transformers import Trainer, TrainingArguments

batch_size=64
logging_steps = len(emotions_encoded["train"]) // batch_size
model_name = f"{model_ckpt}-finetuned-emotion"
# 미세튜닝
training_args=TrainingArguments(output_dir=model_name,
                                num_train_epochs=2,
                                learning_rate=2e-5,
                                per_device_train_batch_size=batch_size,
                                per_device_eval_batch_size=batch_size,
                                weight_decay=0.01,
                                eval_strategy="epoch",
                                disable_tqdm=False,
                                logging_steps=logging_steps,
                                push_to_hub=True,
                                save_strategy="epoch",
                                load_best_model_at_end=True,
                                log_level="error")
- 훈련과 평가에서 하이퍼파라미터 튜닝을 통해 훈련과 평가를 상세하게 제어한다.
- output_dir 은 해당 모델 훈련 내용 저장과 관련한 하이퍼파라미터
- load_best_model_at_end 는 훈련 마지막에 최상의 모델 로드하도록 지정함
trainer = Trainer(model=model, args=training_args,
                  compute_metrics=compute_metrics,
                  train_dataset=emotions_encoded["train"],
                  eval_dataset=emotions_encoded["validation"],
                  tokenizer=tokenizer)
trainer.train()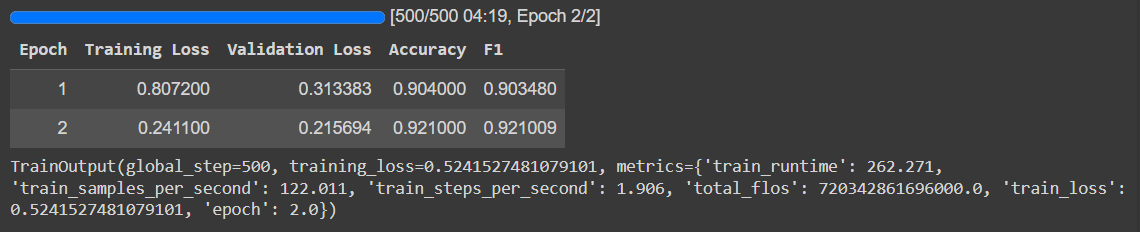
- 정확도 f1 0.9 넘은 높은 점수
8. 결과 확인
preds_output = trainer.predict(emotions_encoded["validation"])
preds_output
PredictionOutput(predictions=array([[ 4.53107 , -0.7775584 , -1.4012804 , -0.8856803 , -0.9855056 ,
-1.713632 ],
[ 4.4535756 , -1.0308809 , -1.826341 , -0.6076372 , -0.7412394 ,
-1.6846356 ],
[-1.3809516 , 2.0858543 , 2.8574872 , -1.2203517 , -1.8115239 ,
-1.377107 ],
...,
[-1.4279227 , 4.4006424 , 0.62544185, -1.3270403 , -1.6897612 ,
-1.3979036 ],
[-1.945214 , 2.705967 , 2.5891738 , -1.3467155 , -1.823038 ,
-1.036768 ],
[-1.6074486 , 4.2176423 , 0.04868877, -1.8051337 , -1.3736098 ,
-0.5582337 ]], dtype=float32), label_ids=array([0, 0, 2, ..., 1, 1, 1]), metrics={'test_loss': 0.2156941294670105, 'test_accuracy': 0.921, 'test_f1': 0.9210092077692902, 'test_runtime': 5.1335, 'test_samples_per_second': 389.6, 'test_steps_per_second': 6.234})
< 예측값 >
import numpy as np
y_preds= np.argmax(preds_output.predictions, axis=1)
y_predsarray([0, 0, 2, ..., 1, 1, 1])
< 진짜값 >
y_valid = np.array(emotions_encoded["validation"]["label"])
y_validarray([0, 0, 2, ..., 1, 1, 1])
< 성능지표 >
preds_output.metrics{'test_loss': 0.2156941294670105,
'test_accuracy': 0.921,
'test_f1': 0.9210092077692902,
'test_runtime': 5.1335,
'test_samples_per_second': 389.6,
'test_steps_per_second': 6.234}
< 라벨 한국어로 >
labels= emotions["train"].features["label"].names
labels['sadness', 'joy', 'love', 'anger', 'fear', 'surprise']
9. ConfusionMatrixDisplay
- confusionMatrix 시각화하는 도구 Display
- 대각선 : 올바르게 예측한 샘플의 수
- 대각선외: 잘못 예측한 샘플의 개수
from sklearn.metrics import confusion_matrix, ConfusionMatrixDisplay
import matplotlib.pyplot as plt

cm = confusion_matrix(y_valid, y_preds, normalize="true")
fig, ax = plt.subplots(figsize=(6,6))
disp =ConfusionMatrixDisplay(confusion_matrix=cm, display_labels=labels)
disp.plot(cmap="Blues", values_format=".2f", ax=ax, colorbar=False)
plt.title("Normalized confusion matrix")
plt.show()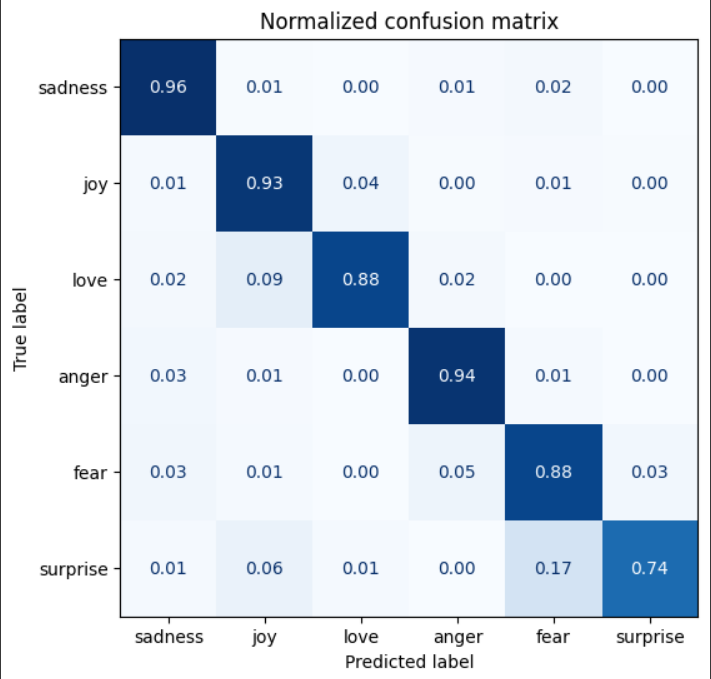
10. 허깅페이스 모델 공유
trainer.push_to_hub(commit_message="Emotion classification Training Completed!")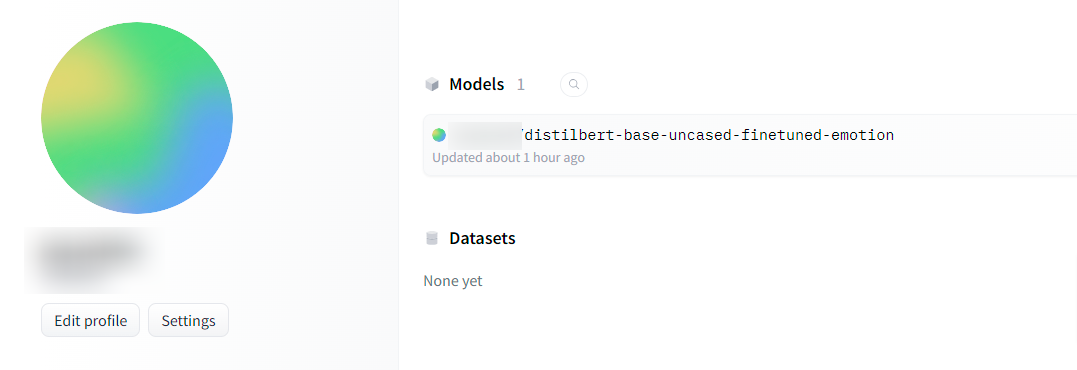
11. 모델 테스트
from transformers import pipeline
model_id ="<YOUR HUGGINGFACE ID>/distilbert-base-uncased-finetuned-emotion"
classifier = pipeline("text-classification", model=model_id)
- model_id 첫 부분에 아이디 그대로 쓰기 < > 제외
test = "I met my family. We had a meal together and shared a lot of stories."
preds = classifier(test, top_k =None)[{'label': 'LABEL_2', 'score': 0.26157766580581665},
{'label': 'LABEL_1', 'score': 0.2409876585006714},
{'label': 'LABEL_3', 'score': 0.17143388092517853},
{'label': 'LABEL_4', 'score': 0.15340450406074524},
{'label': 'LABEL_5', 'score': 0.10507941246032715},
{'label': 'LABEL_0', 'score': 0.06751684099435806}]
import pandas as pd
preds_df = pd.DataFrame(preds)
preds_df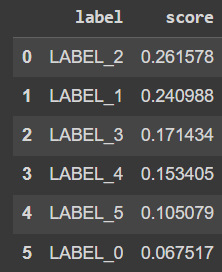
자연어처리, 트랜스포머, 허깅페이스, 토큰 로그인 모델 가져오기 저장하기, 미세튜닝, AutoTokenizer, transformer, confusionmatrixdisplay, 혼동행렬 시각화, trainer, trainingArguments
'머신러닝 > 자연어처리' 카테고리의 다른 글
| 허깅페이스 트랜스포머 NLP 클래스 (2) | 2024.11.14 |
|---|---|
| 트랜스포머 모델 쉽게 설명, transformer, 인코더, 디코더, 어텐션, hidden state, context, 분류헤드, embedding, 임베딩 (0) | 2024.08.25 |
| 자연어처리, 트랜스포머, 구글 코랩 GPU 사용 방법, T4GPU TPUv2, cls토큰 (0) | 2024.08.22 |
| 허깅페이스, 트랜스포머, 자연어처리, 데이터셋로드, 문자, 단어, 토큰화, AutoTokenizer (0) | 2024.08.22 |
| 트랜스포머, 자연어처리, pipeline, 감정분류, 개체명인식, 질문답변, 요약, 생성 (0) | 2024.08.22 |